Tag Archives: Sin Huevos

Crepas de Spelt sin Huevos

15 Jul

Ya hace algún tiempo que estaba loca por compartir una receta de crepas que no tuviera huevos…

Es que todas las recetas tradicionales por ahí los tienen y estaba segura que podía tener los mismos resultados sin la necesidad de añadirle hueveos a la mezcla.


CREPAS DE SPELT SIN HUEVOS

1 ½ tazas de harina de spelt orgánica
½ cdita de sal kosher
2 tazas de leche de soya, mas 6 cdas
4 ½ cditas de replicador de huevos (egg replacer)
5 cdas de mantequilla, derretida
1 cda de aceite de oliva
¼ de taza de agua, si fuese necesario


  1. En una cacerolita pequeña a fuego bajo, derrite la mantequilla.  Pon a un lado.
  2. En un bowl pequeño, mezcla bien el egg replacer y las 6 cdas de leche de soya.  Ponlo a un lado.
  3. En un bowl grande, cierne bien la harina y la sal.  Ponlo a un lado.  Es importante cernir la harina de spelt, porque tiene unas hojuelitas que no necesitamos si queremos una mezcla suavecita.
  4. Echa la leche de soya restante en una licuadora.  Añádele la mantequilla derretida, la mezcla de egg replacer y la harina.  Licúalo bien por unos minutos.  Coloca el vaso de la licuadora con la mezcla en la nevera para que repose por 2 horas mínimo.  Yo hice la mezcla por la mañana para usarla en la tarde.


  1. Cuando esté lista para usar la mezcla, sácala de la nevera y menéala un poco y asegúrate que tiene la consistencia de una mezcla da pancakes finita.  Si sientes que está muy espesa, añádele ¼ de agua para hacerla más livianita.
  2. Calienta un sartén pequeño a fuego mediano.  Añádele la cda de aceite de oliva y espárcela con un papel toalla en el sartén.
  3. Vierte un cucharon de sopa de mezcla en el sartén, mientras viras el sartén para que la mezcla se esparza en una capa finita sobre el fondo del sartén.  No se desesperes si las primeras veces no te sale muy bien.  Me tomo unas cuantas veces cogerle el swing a echar la mezcla y virar el sartén a la misma vez.  Pero se puede…
  4. Despega las orillitas de la crepa del sartén usando una espatulita.  Veras que la crepa hace burbujitas, tal y como lo hacen cuando haces pancakes.  Poquito a poco vas despegando la crepa del sartén usando una espátula de silicón.  Cuando puedas mover la crepa al mover el sartén, como al minuto de estarla cocinando, es tiempo de virarla por el otro lado usando la espátula de silicón.
  5. Cocina la crepa por el otro lado como por 30 segundos.  Y escurre la crepa del sartén sobre un plato con papel de cera por encima.
  6. Repite el proceso hasta que acabes la mezcla de crepas.  Pásale el papel toalla con aceite de oliva al sartén de vez en cuando para asegurarte que nada se pega.


Sírvelas inmediatamente o puedes guardarlas en un recipiente al vacio en la nevera como por 2 semanas.  Las crepas tienen suficiente mantequilla que no se pegarán unas con las otras.

Si las guardas en la nevera, sólo tienes que recalentarlas un poquito en un sartén tibio como por 1 minuto para que estén suavecitas y moldeables nuevamente.  Usé estas crepas para mi Gateau des Crepes, pero también son deliciosas como postre rellenas de cajeta/dulce de leche o con jalea de frutas.

Bizcochitos de Zanahorias

24 Abr

Es primavera, o cómo decimos aquí en Puerto Rico… Llegó el Verano!!!  El calor ya está atacando, la humedad aumenta y estoy en el mood de hornear bizcochitos.

Aprendí esta receta originalmente del señor Alton Brown, uno de mis maestros culinarios del Food Network.  Me encanta esta receta de bizcochitos porque no es necesario una batidora para hacerla.  Es super sencilla y siempre queda bien.  Siempre los hago cuando hay que hornear algo para recaudar fondos para el Centro de Yoga.  La gente siempre se queda con los deseos de comprarme o comer más.  Son blanditos y saben deliciosos.  Usualmente los hago con un frosting de queso crema, pero en esta ocasión no lo hice por la gran cantidad de gente en el centro que está velando los lácteos.  Pero un día de éstos los hago con el frosting y les comparto la receta.

Además, estos bizcochitos fueron la 1era receta que hice cuando me dediqué por un tiempo a hacer órdenes de cositas de comer.  Estoy en proceso de determinar mi próxima movida profesional y no estoy segura si debe ser algo relacionado al mundo culinario…  estos bizcochitos son un delicioso comienzo.  Esta foto es de una de las prácticas que hice antes de salir «a la calle» a venderlos.  Sé que debo hacerlos más grandecitos aún así que estoy tanteando con las cantidades por bizcochito.  Pero para disfrutarlos en la comodidad de tu hogar, las proporciones de la mezcla están perfectas…  


BIZCOCHITOS DE ZANAHORIA

2 ½ tazas de harina integral pastry
5 zanahorias medianas, ralladas
1 cdita baking powder
1 cdita baking soda
¼ cdita canela en polvo
¼ cdita nuez moscada
½ cdita sal
1 ½ taza azúcar negra
4 ½ cditas de egg-replacer mezclado con 6 cdas de agua
6 oz de yogurt plain
6 oz de aceite vegetal o grapeseed oil
½ taza de pasas
½ taza de nueces, picadas
 
  1. Pre-calienta el horno a 350F.
  2. Mide la harina, baking poder, baking soda, especias y sal y ciérnela en un bowl grande.
  3. A ese bowl con la harina, añade las zanahorias ralladas. Mézclalas bien para que la harina cubra cada pedacito de zanahoria.
  4. En un procesador de alimentos, combina el azúcar, egg replacer, aceite y yogurt. Añade esta mezcla a las zanahorias cubiertas de harina. Mézclalo todo bien asegurándote que no haya harina seca para nada.
  5. Añade las pasas y las nueces picaditas. Combínalo todo bien.
  6. Coloca liners en un molde de cupcakes y vierte aproximadamente ¼ taza de mezcla por bizcochito.
  7. Hornea en el medio del horno preferiblemente por 35 minutos.
  8. Reduce la temperatura del horno a 325F y hornea por otros 15 minutos adicionales.
  9. Remueve los moldes del horno y déjalos enfríar un poco en unos racks. Después de 30 mins, saca los bizcochitos y déjalos enfriar en los racks fuera del molde.


Eggless Scramble – A Taste of Yellow 2008

19 Abr

Barbara at Winos and Foodies is hosting A Taste of Yellow 2008 to celebrate LiveSTRONG Day.  As you may recognize, LiveSTRONG is the organization Lance Armstrong created to raise awareness and funds for the research and eventual cure of cancer.

Barbara is a cancer survivor and when I read her story in her original round-up of A Taste of Yellow 2007, I was inspired and touched, because my family, like many, many families around the world has been struck by cancer too…  my grandma developed a skin cancer tumor in an ankle, my aunt had cancer cells in her bladder and my grandpa passed away from complications from prostate cancer.  Plus, she is a traveler just like me… and learned about her diagnosis right after completing the challenging and spiritual Camino de Santiago.

I am a firm believer that food can be your nourishment as well as your medicine.  I also believe that what we eat over our lifetime determines how healthy we will be overall.  We can stray to savor some goodies here and there, but overall we need to eat as naturally and organically as possible to give our body the best fuel possible.

Soybeans are the only vegetable containing all the essential amino acids needed for human health.  Soy protein has been linked to benefiting and decreasing risks of certain cancers, when consumed in moderation. Also, tofu is a vegetable source of omega-3 fatty acids.  This is why I decided to submit my Eggless Scramble recipe to A Taste of Yellow 2008.


EGGLESS SCRAMBLE

Scramble:
½ package of firm silken tofu
3 tbs soymilk or buttermilk
1/3 cup water
1 tbs olive oil
Squirt of Dijon mustard
3 tbs cornstarch
½ tbs garlic salt
½ tsp turmeric
A pinch of paprika
 
Filling:
¼ Small onion, chopped small
½ Tomato, chopped small
¼ Green bell pepper, chopped small


  1. Spray a medium non-stick skillet with canola oil spray and heat over medium-high heat.  If your skillet has a cover, even better.
  2. Sautee the filling ingredients of your choice until softened – I was going for a western-style scramble here at the beginning. (You’ll see why the qualifier later on).
  3. Blend together all scramble ingredients until smooth.
  4. When the skillet is very hot, pour the batter in the center of the skillet, turning it around a few times until the batter reaches the edges evenly.   
  5. When it has set somewhat, sprinkle the filling ingredients on top.  Cover the skillet for a few minutes to help the scramble batter cook thoroughly.
  6. Check the bottom for doneness and browning.  With a heat-proof spatula, break the tofu mixture to resemble scrambled eggs.  The filling will combine with the scramble.

 Serve hot.  I added my Tomato Relish on top for added veggies and a little zing!!


TOMATO RELISH

10 grape or cherry tomatoes, chopped small
2-3 sun-dried tomatoes, chopped small
4-5 fresh basil leaves, cut into thin strips
1 garlic clove, finely minced
2-3 tbs extra-virgin olive-oil, or as much needed to almost cover the tomatoes
Salt and freshly cracked Black Pepper
  1. Mix everything in a small dish.
  2. Let all ingredients macerate together for about 30 minutes, mixing it all occasionally during that time.


Dorie’s Perfect Party Cake – DBC March 2008

30 Mar

pinklogo2.jpg

I was very excited to receive the recipe for March 2008 Daring Bakers Challenge – a cake!!!  That is definitely something I can do.   This month’s challenge is hosted by Morven at Food, Art and Random Thoughts and the original recipe comes from Dorie Greenspan’s Baking: From My Home to Yours.  So thanks Morven for such a nice recipe.  I was so excited about this recipe that I actually tried it twice – the first time I made it with whole wheat pastry flour and the second time I tried it with spelt flour.  As you’ll see, spelt yielded better results overall.  What I loved most about this challenge was that Morven gave us the flexibility to change ingredients and presentation as long as we followed the basic recipe components – the cake, the frosting and the fruit preserves.  The rest, was up to us, the creative daring bakers…

I was faced with 2 other challenges for this recipe… First, I do not own any round cake pans – as I mentioned in my last DBC post, I am not a «baker» per se, so I have never attempted to do any layered cakes before and second, I could not find lemon extract anywhere.  My solutions to these dilemmas…  to use my cupcake/muffin pans and to double on the lemon zest and add the juice of the lemons to get the lemony taste.

 spelt-final.jpg

So here’s the Karma-Free version of Dorie’s Perfect Party Cake…

For the Cake:
2  ½ cups spelt flour
1 tbs baking powder
½ teaspoon salt
1 ¼ cups buttermilk
6 tsp egg replacer diluted into 8tbs water
1 ½ cups brown sugar
Zest of 2 lemons (about 4 tsp)
1 stick unsalted butter, at room temperature
The juice of 1 lemon
For the Sweetened Whipped Cream frosting:
1 pint heavy cream
1 cup brown sugar
1 tsp vanilla powder
For Finishing:
2/3 cup seedless raspberry or strawberry preserves stirred vigorously or warmed gently until spreadable
  1. Centre a rack in the oven and preheat the oven to 350 degrees F. Butter and flour your pans – I used 2 cupcake/muffin pans. I also used cupcake liners and worked great too.

To Make the Cake

    2. Sift together the spelt flour, baking powder and salt. Set aside.

    3. Whisk together the egg substitute and buttermilk. Set aside.

    4. Whisk together the sugar and lemon zest in a mixer bowl or another large bowl and rub them together with your fingers until the sugar is moist and fragrant.

    5. Add the butter and working with the paddle or whisk attachment, or with a hand mixer, beat at medium speed for a full 3 minutes, until the butter and sugar are very light.

    6. Beat in the lemon juice, then add one third of the flour mixture, still beating on medium speed.

    7. Beat in half of the milk-egg sub mixture, then beat in half of the remaining dry ingredients until incorporated.

    8. Add the rest of the milk/egg sub mixture beating until the batter is homogeneous, then add the last of the dry ingredients.

    9. Finally, give the batter a good 2- minute beating to ensure that it is thoroughly mixed and well aerated.

  10. Divide the batter in your muffin/cupcake pans.

  11. Bake for 30-35 minutes, or until the cupcakes are well risen and springy to the touch – a thin knife inserted into the centers should come out clean

  12. Transfer the cakes to cooling racks and cool for about 5 minutes, then take them out of the pans to fully cool.
 

To decorate the Cake

I made a Sweetened Whipped Cream Frosting just because I do not particularly like the taste of buttercream.  So, to make the frosting:

  1. Using both a chilled bowl and chilled beaters, beat the cream until frothy.
  2. Add the brown sugar and vanilla gradually while beating.
  3. Whip until light and a thick enough consistency to spread as an icing.
  4. Use immediately.

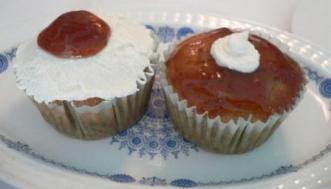
Here are my renditions of these lovely cupcakes… 

whole-wheat-version.jpg     spelt-2.jpg

This first picture is the whole wheat version.  As you can see, the tops cracked and the color was a bit paler.  The picture on the right, are the spelt version, with much nicer color, top texture and flavor too.

As you can see, I still have a lot of ways to go in terms of decorating techniques… but the flavors were spot on.

combo-1.jpg     combo-2.jpg

combo-3.jpg     combo-4.jpg

This recipe is super easy to make.  After you’ve done it once, the following tries are much, much easier… and everyone who had the chance to taste them were impressed by the lemony taste and the crispiness that the bundt muffin pan imparted to the outside…  aren’t they cute?

My favorite way to eat them was to leave them plain, without any decorations, and just spread some of the preserves to a morsel of cupcake and pop it in my mouth.  Delectable!!

Storing
The cake is best the day it is made, but you can refrigerate it, well covered, for up to two days. Bring it to room temperature before serving.

    combo-6.jpg                    combo-5.jpg

TuNofish Salad Sandwich

1 Feb

I am a sandwich person at heart… I love sandwiches for lunch or even dinner.  Heck, I love sandwiches for breakfast and snacks as well.  I bought these nice whole wheat hoagie rolls this last week and I have just been making sandwiches away… 

One of my favorite ones is TuNofish Salad – pay attention to the spelling, because it’s made with Tuno, the soy protein flavored with seaweed to taste like regular tuna.  It’s light and makes a great lunch.  My friend Jesiel would say it makes a great breakfast… because she only has tuna sandwiches as breakfast, ever since she was a little kid… 

It’s super simple…

tunofish-sandwich-4.jpg

TuNofish SALAD SANDWICH

1/3 cup Tuno soy protein, defrosted and squeezed as dry as possible
3 tbs egg-free mayonnaise, such as Vegenaise
1 tbs finely chopped onion
juice of 1/2 lemon or lime
Garlic salt and pepper to taste
Choice of bread – I used a whole wheat hoagie roll
Lettuce – romaine or arugula works great
3 tomato slices
Extra mayo to spread
  1. Mix together in a bowl the Tuno, mayo, onion, lemon juice, garlic salt and pepper. 
  2. Toast bread to your liking.
  3. Spread mayo on both sides.
  4. Place TuNo salad on bottom bread.  Top with lettuce and tomatoes.  Sprinkle some salt and pepper on top of tomatoes.

Enjoy with your favorite kind of natural potato chips or plantain chips.

Just to give you an idea that if you enjoy tunafish sandwiches and you decide to go veggie, you will not have to give the experience or the flavor.  Believe me, these taste just as good as the real thing used to taste to me.

Try it…